Last Updated on May 6, 2026 by Rita
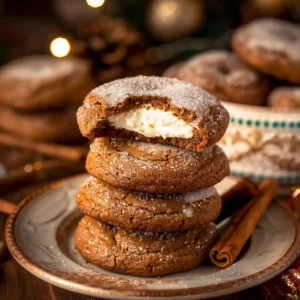
Mini little debbie christmas tree cookies are soft, bite-sized sugar cookies flavored like cake batter and ready in under 1 hour plus cooling time. This recipe answers your search for festive cookies that are small, adorable, and topped with smooth icing and sprinkles. I remember making mini little debbie christmas tree cookies in my cozy Oregon kitchen, where my grandmother always said tiny desserts bring the biggest smiles. These cookies turn out pillowy soft, lightly sweet, and decorated just like the classic holiday treat we all love.
They are simple to make, yet they look magical on any holiday table.
For another cozy cookie idea, I love baking Mini Egg Chocolate Cookies when I want something festive and fun.
Table of Contents
Table of Contents
What is Mini Little Debbie Christmas Tree Cookies?
Mini little debbie christmas tree cookies are soft, bite-sized sugar cookies inspired by the famous holiday snack cakes, decorated with white icing, green sprinkles, and red drizzle. I love how these tiny treats bring that nostalgic flavor into a homemade cookie version that feels both fun and festive.
What makes mini little debbie christmas tree cookies special is their texture. They stay incredibly soft and pillowy, almost like a mix between a sugar cookie and a cake. The cake batter flavor adds a subtle sweetness that makes them stand out from classic holiday cookies.
These cookies are designed to look just like the iconic Christmas tree cakes, but in a smaller, more shareable form. I often make them for holiday trays because they instantly grab attention and make people smile.
Another reason I love this recipe is how approachable it feels. Even though the decoration looks detailed, the process stays simple with dipping and drizzling techniques.
When I want more festive cookie inspiration, I also enjoy baking Cream Egg Stuffed Cookies for another colorful cookie tray idea.
Key Ingredients for Making Mini Little Debbie Christmas Tree Cookies
To make the best mini little debbie christmas tree cookies, I always follow the exact ingredient list because each one creates that soft, cake-like texture and iconic holiday look. These ingredients work together to give the cookies their signature melt-in-your-mouth feel.
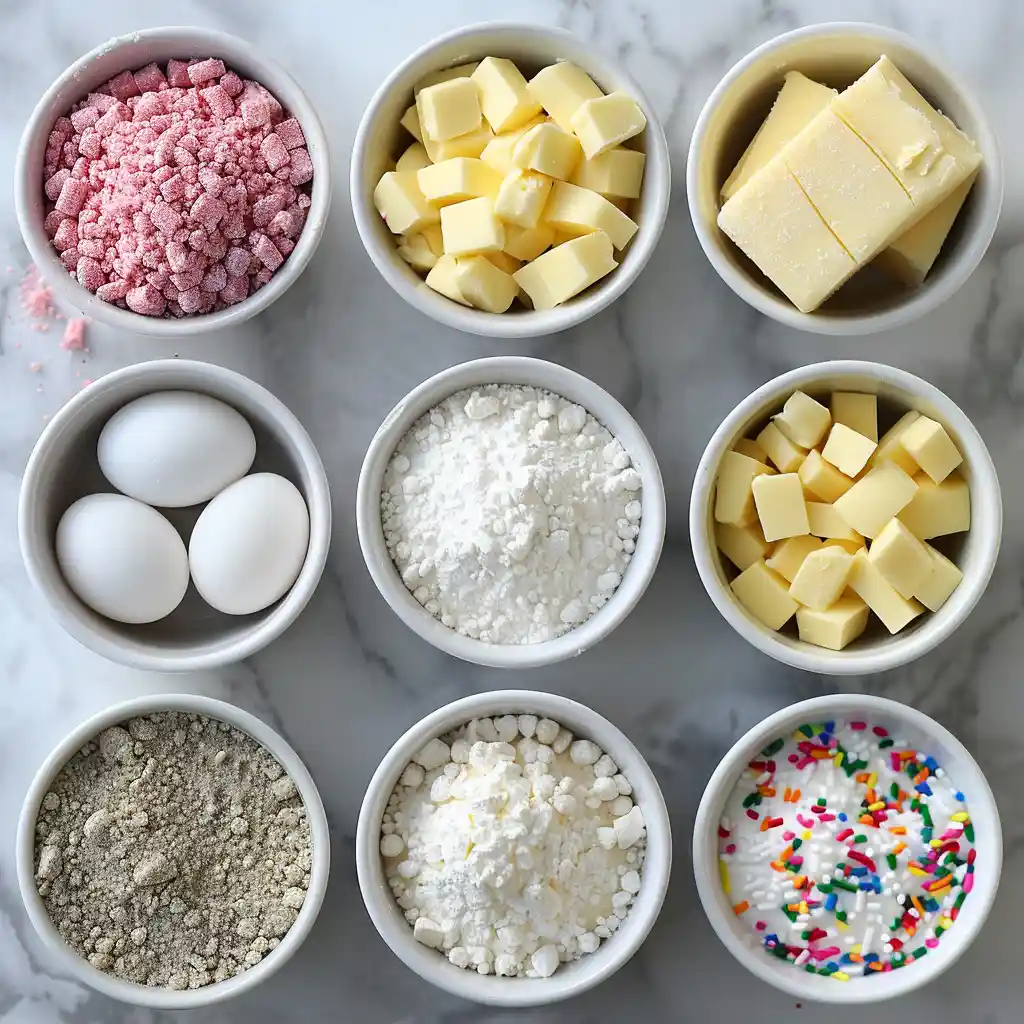
For the Cookie Dough
| Ingredient | Purpose |
|---|---|
| 1/2 cup salted butter, softened | Creates a rich, soft base |
| 2/3 cup powdered sugar | Makes cookies soft and tender |
| 1 egg | Binds ingredients together |
| 1/2 tbsp cake batter flavor | Adds signature cake flavor |
| 2 cups all-purpose flour | Provides structure |
| 1 tsp baking powder | Helps cookies puff slightly |
| 1/4 tsp salt | Balances sweetness |
| 1-3 tsp water | Brings dough together |
I love how powdered sugar gives mini little debbie christmas tree cookies that delicate, soft texture instead of a crisp bite.
For the Icing + Toppings
| Ingredient | Purpose |
|---|---|
| 6 tbsp very warm water | Forms glaze base |
| 1 1/2 tbsp light corn syrup | Adds shine and helps set icing |
| 1 1/2 tsp vanilla | Enhances flavor |
| white + red gel food coloring | Creates classic holiday look |
| 4 1/2 cups powdered sugar, sifted | Thickens icing |
| green sanding sugar sprinkles | Adds festive decoration |
These ingredients create the smooth icing and bright decorations that define mini little debbie christmas tree cookies.
For another fun cookie variation, I sometimes explore ideas from Reese’s Chocolate Chip Cookies to add a chocolate twist to my holiday baking.
How to Make Mini Little Debbie Christmas Tree Cookies in 9 Steps
Making mini little debbie christmas tree cookies feels fun and creative, especially when you see them transform into those adorable holiday treats. I always follow these steps carefully to get that soft texture and clean decoration.
Step-by-Step Instructions
Step 1: Preheat the oven
Preheat your oven to 350°F (180°C) and line your baking sheet with parchment paper.
Step 2: Cream butter and sugar
In a mixing bowl, beat the softened butter and powdered sugar until smooth and creamy.
Step 3: Add egg and flavoring
Mix in the egg and cake batter flavor until mostly combined.
Step 4: Add dry ingredients
Add flour, baking powder, and salt. Begin mixing, then add 1–3 teaspoons of water until a soft dough forms.
Step 5: Roll and cut dough
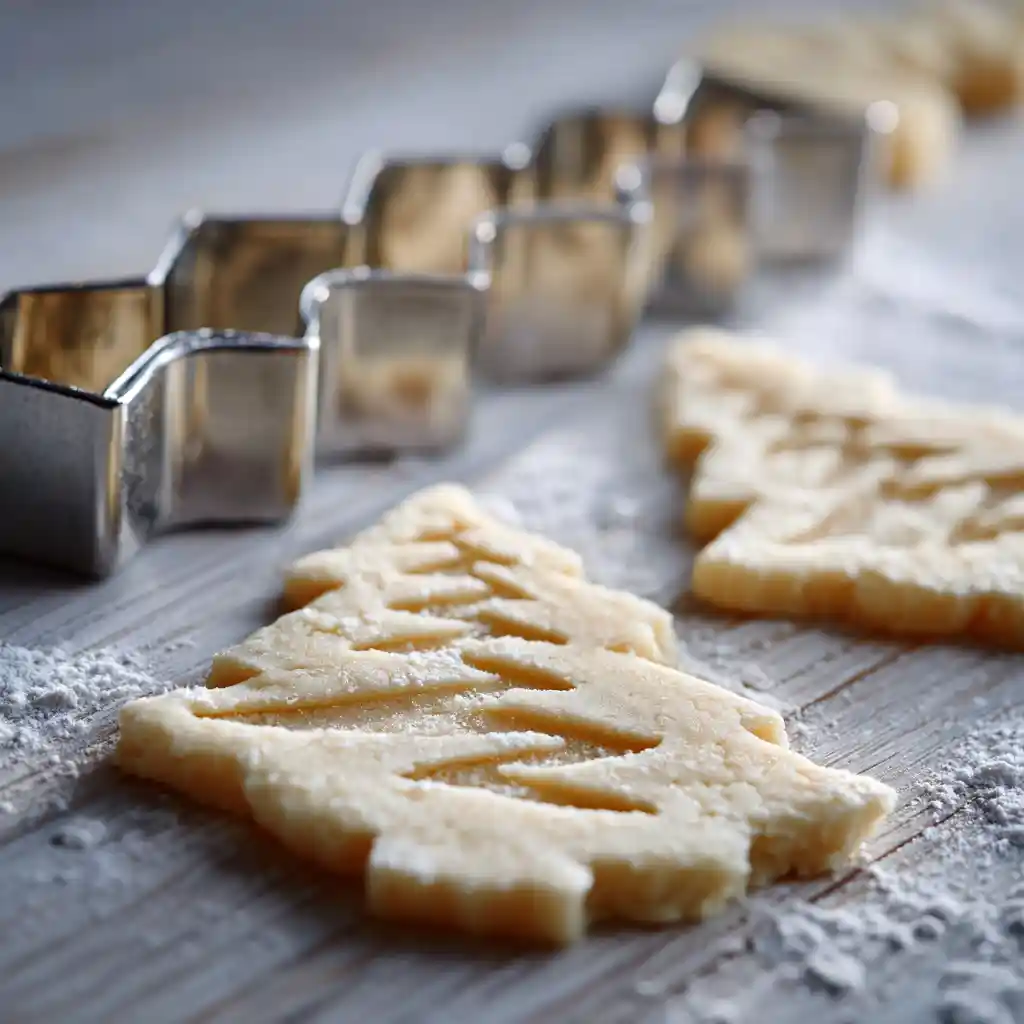
Roll the dough to about 1/2 inch thick, then cut into small Christmas tree shapes.
Step 6: Bake cookies
Place cookies on the baking sheet and bake for about 5 minutes until slightly puffed and matte on top.
Step 7: Cool completely
Let the cookies cool fully before decorating. This step keeps the icing smooth and stable.
Step 8: Prepare icing
Whisk warm water, corn syrup, and vanilla. Add white coloring, then whisk in powdered sugar until smooth.
Step 9: Decorate cookies
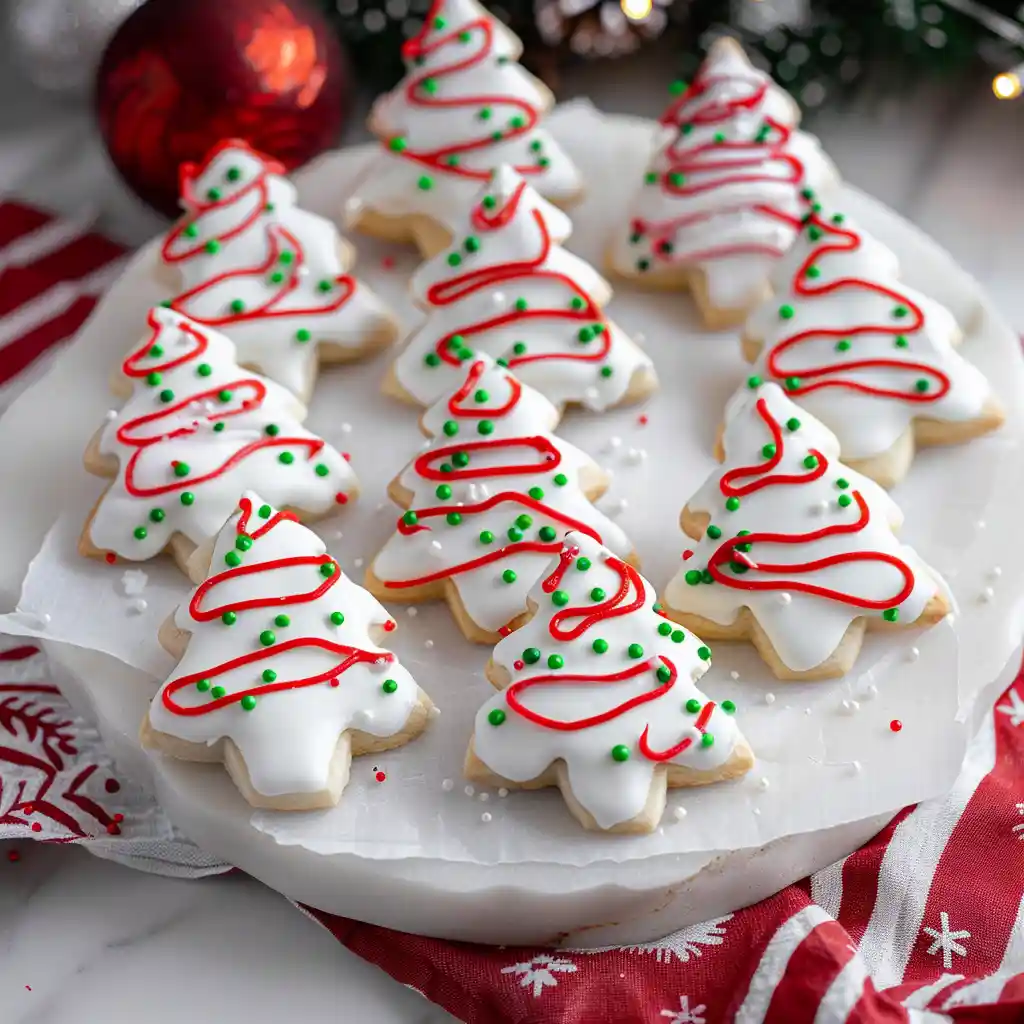
Dip cookies into icing, add green sprinkles, then drizzle red icing on top. Let them set completely before serving.
I love watching mini little debbie christmas tree cookies come together during the decorating step. That’s when they really start to look like the classic holiday treat.
Equipment Needed for Making This Recipe
To make mini little debbie christmas tree cookies, I always keep my tools simple and organized. Having the right equipment helps me move smoothly through each step, especially during the decorating process.
You don’t need anything complicated, just a few reliable baking tools:
- Mixing bowl
- Electric mixer or stand mixer
- Measuring cups and spoons
- Rolling pin
- Small Christmas tree cookie cutter
- Baking sheet
- Parchment paper or silicone baking mat
- Cooling rack
- Whisk (for icing)
- Piping bag or zip-top bag (for red drizzle)
I always use a small cookie cutter because it gives these cookies their signature mini size. It also makes them perfect for sharing during the holidays.
The piping bag helps create clean red drizzle lines, which really brings the mini little debbie christmas tree cookies to life. Even a simple zip-top bag works perfectly if you don’t have piping tools.
Keeping everything ready before starting makes the process faster and much more enjoyable. When I want another cozy holiday-style treat, I also love Gingerbread Cheesecake Cookies for a warm spiced cookie option.
The Health Benefits of Mini Little Debbie Christmas Tree Cookies
While mini little debbie christmas tree cookies are definitely a festive treat, I still like to understand what each ingredient brings to the table. I always enjoy desserts in moderation, and knowing the components helps me balance indulgence with awareness.
These cookies focus more on comfort and joy than nutrition, but a few ingredients still offer small benefits when enjoyed occasionally.
Here’s a simple breakdown:
| Ingredient | Benefit |
|---|---|
| Egg | Provides protein and structure |
| Butter | Adds energy and richness |
| Flour | مصدر carbohydrates for energy |
| Corn syrup (icing) | Helps create smooth texture |
| Powdered sugar | Quick energy source |
The soft texture of mini little debbie christmas tree cookies comes from powdered sugar and butter working together, which creates that melt-in-your-mouth experience.
I always treat these cookies as a special holiday dessert rather than an everyday snack. That mindset helps me enjoy every bite without overthinking it.
When I want something lighter between holiday treats, I sometimes switch to recipes like 4 Ingredient No Bake Carrot Oatmeal Cookies for a simpler option.
Expert Tips for the Best Texture
Getting the perfect texture in mini little debbie christmas tree cookies comes down to a few simple techniques that I always follow. These small details make the cookies soft, pillowy, and easy to decorate.
First, I always cream the butter and powdered sugar until completely smooth. This step creates a light base and helps the cookies stay soft instead of dense.
Next, I carefully control the dough consistency. I add water slowly, just until the dough becomes soft and easy to roll. If I add too much, the dough becomes sticky and harder to handle.
Another important tip is rolling the dough evenly. I always keep it about 1/2 inch thick so the cookies bake evenly and puff up nicely.
Here are my go-to texture tips:
- Use softened butter, not melted
- Mix until just combined after adding flour
- Add water gradually to control dough texture
- Roll dough evenly for consistent baking
- Do not overbake (cookies should look matte, not browned)
I also pay close attention to baking time. I remove the cookies when they look set but still soft. This keeps mini little debbie christmas tree cookies tender and prevents dryness.
Finally, I always let the cookies cool completely before icing. This step ensures the glaze sets smoothly and doesn’t slide off.
When I want another soft and cozy cookie idea, I sometimes bake Peanut Butter Blossoms for a classic melt-in-your-mouth texture.
Variations of Mini Little Debbie Christmas Tree Cookies
One of my favorite things about mini little debbie christmas tree cookies is how easy they are to customize. I can keep the classic look or switch things up depending on the occasion, and they always turn out fun and festive.
If I want to change the flavor, I sometimes swap the cake batter flavor for vanilla or almond extract. This gives the cookies a slightly different taste while keeping that same soft texture.
For decoration, I like to play with colors. Instead of the classic white, green, and red, I might use pastel shades for spring or bold colors for themed parties.
Here are some creative variations I enjoy:
| Variation | What to Change |
|---|---|
| Chocolate version | Add cocoa powder to the dough |
| Vanilla almond twist | Replace cake batter flavor with almond extract |
| Holiday colors | Use different icing and sprinkle colors |
| Mini sandwich cookies | Add a thin layer of frosting between two cookies |
| Glitter finish | Use edible glitter instead of sanding sugar |
I also love turning these into sandwich cookies by adding a thin layer of frosting in the middle. It adds richness and makes mini little debbie christmas tree cookies feel even more special.
Sometimes, I keep things simple and skip the drizzle for a clean iced look. Other times, I go all out with decorations for a more playful finish.
When I want another creative cookie idea, I enjoy making Mini Egg NYC Cookies for a colorful and bakery-style treat.
Storage and Reheating Tips for Mini Little Debbie Christmas Tree Cookies
I always store mini little debbie christmas tree cookies carefully so they keep their soft texture and beautiful decoration. Since the icing needs time to set, proper storage makes a big difference.
First, I let the cookies sit at room temperature until the icing fully hardens. This step prevents smudging and keeps the design clean.
Once set, I place them in an airtight container and store them at room temperature. They stay fresh for up to 3 days while keeping their soft, melt-in-your-mouth texture.
Here’s a simple storage guide I follow:
| Method | How to Store | Duration |
|---|---|---|
| Room temperature | Airtight container | Up to 3 days |
| Freezer | Freeze after icing sets | Up to 3 months |
If I want to freeze them, I first place the cookies on a baking sheet and freeze until firm. Then I transfer them to a zip-top bag. This method keeps the icing intact.
When I’m ready to enjoy them again, I let them thaw at room temperature. I never microwave these cookies because it can ruin the icing and texture.
I’ve noticed that mini little debbie christmas tree cookies taste just as soft after thawing, which makes them perfect for planning ahead during the holidays.
When I prepare a full dessert table, I sometimes pair them with No Bake Biscoff Pie for a mix of textures and flavors.
Common Mistakes to Avoid When Making Mini Little Debbie Christmas Tree Cookies
Even though mini little debbie christmas tree cookies are simple to make, a few common mistakes can affect their texture and appearance. I’ve learned to avoid these so my cookies turn out soft, smooth, and beautifully decorated every time.
One of the biggest mistakes is adding too much flour. When I do that, the cookies turn dry instead of soft. I always measure carefully to keep that pillowy texture.
Another issue is overbaking. These cookies bake quickly, so I remove them as soon as they look matte and slightly puffed. Leaving them too long makes them firm instead of tender.
Here are the most common mistakes I avoid:
| Mistake | Why It Matters |
|---|---|
| Too much flour | Makes cookies dry and crumbly |
| Overbaking | Removes soft texture |
| Icing too early | Causes glaze to slide off |
| Too much water in dough | Makes dough sticky and hard to shape |
| Decorating with wet icing | Causes sprinkles to bleed |
I also make sure the cookies cool completely before icing. If I rush this step, the glaze won’t set properly and the decorations won’t look clean.
Another detail I pay attention to is icing consistency. It should drizzle smoothly and settle within a few seconds. If it’s too thin, it won’t coat evenly.
When I avoid these mistakes, mini little debbie christmas tree cookies come out soft, festive, and picture-perfect every time.
Frequently Asked Questions About Mini Little Debbie Christmas Tree Cookies
Can I make mini little debbie christmas tree cookies ahead of time?
Yes, you can make mini little debbie christmas tree cookies ahead of time. Bake and decorate them, then store in an airtight container at room temperature for up to 3 days. You can also freeze them for longer storage.
How do I get smooth icing on Christmas tree cookies?
To get smooth icing on mini little debbie christmas tree cookies, whisk warm water, corn syrup, vanilla, and powdered sugar until smooth. The icing should drizzle easily and settle within about 5 seconds for a clean finish.
Can I freeze mini little debbie christmas tree cookies?
Yes, these cookies freeze well. Let the icing set completely, then freeze them on a tray before transferring to a bag. Thaw at room temperature before serving.
Why are my cookies not soft?
If your cookies are not soft, they were likely overbaked or had too much flour. I always bake just until the tops look matte and measure ingredients carefully to keep mini little debbie christmas tree cookies soft and tender.
Final Thoughts, Why You’ll Love This Mini Little Debbie Christmas Tree Cookies
I always come back to mini little debbie christmas tree cookies when I want something festive, fun, and truly memorable. These cookies bring together everything I love soft texture, sweet icing, and that nostalgic holiday look.
What makes them special for me is how simple they feel once I start. I mix a few basic ingredients, shape the dough, and suddenly I’m creating something that looks straight out of a holiday bakery. Every time I decorate them in my Oregon kitchen, I feel that same joy I felt baking with my grandmother.
I also love how flexible this recipe is. I can keep the classic look or get creative with colors and decorations. Either way, mini little debbie christmas tree cookies always bring smiles.
Most importantly, these cookies are perfect for sharing. Whether it’s a holiday party, a gift box, or a cozy night at home, they always feel special.
Discover more cozy dessert recipes in minutes, comfort and sweetness await in every mug.
👉 Save your next craving on Pinterest boards and discover more no-bake dessert recipes you can make in just minutes.
👉 Join me on Facebook page and discover more quick dessert recipes made with love, your next 5-minute chocolate moment is waiting!
“If you tried this recipe, tell me how it turned out. Did you keep it gooey or cook it fully?”
Print
How to Make Mini Little Debbie Christmas Tree Cookies – Easy Festive Guide
The merriest mini little debbie christmas tree cookies with soft cake batter flavor and festive icing.
- Total Time: 52 minutes
- Yield: 24 cookies 1x
Ingredients
1/2 cup salted butter, softened
2/3 cup powdered sugar
1 egg
1/2 tbsp cake batter flavor
2 cups all-purpose flour
1 tsp baking powder
1/4 tsp salt
1–3 tsp water
6 tbsp very warm water
1 1/2 tbsp light corn syrup
1 1/2 tsp vanilla
white + red gel food coloring
4 1/2 cups powdered sugar, sifted
green sanding sugar sprinkles
Instructions
1. Preheat the oven to 350°F (180°C).
2. In the bowl of a stand mixer or with an electric hand mixer, combine the butter and powdered sugar until smooth.
3. Add in the eggs and cake batter flavor, mixing until mostly combined.
4. Add the flour, baking powder and salt. Begin to mix and add up to the 3 tsp of water to bring the dough together, the dough should be soft and easy to work with.
5. Roll the dough out until approximately 1/2 inch thick and use a christmas tree cookie cutter to cut the dough.
6. Arrange on a silicone or parchment lined cookie sheet. Bake at 350°F for 5 minutes or until the cookies are matte looking on top and have puffed up.
7. Allow the cookies to cool completely and then make the glaze.
8. To make the glaze, whisk together the warm water, corn syrup and vanilla. Once the corn syrup is dissolved, add in enough white food coloring to make the water mixture completely white.
9. Whisk in the sifted powdered sugar, whisking until smooth.
10. Feel free to add a tiny bit more water, if needed, to get a smooth consistency that drizzles and melts back into itself within about 5 seconds.
11. Remove about 1/4 cup of the icing and set aside.
12. Warm the remaining white icing in the microwave and then dip each cookie completely into the icing and set on a cookie cooling rack. Top with the green sprinkles before the icing has set but you don’t want the icing to be really wet or else the sprinkles will bleed.
13. Once all of the cookies have been iced, dye the icing you set aside red using red gel food coloring.
14. Transfer the red icing into either a piping bag or a small zip top bag and snip the corner.
15. Moving from left to right and then back again, drizzle the red icing onto each christmas tree.
16. Allow the cookies to set completely before serving.
17. Store in an airtight container for up to 3 days at room temperature, enjoy!
Notes
Use softened butter, not melted
Do not overbake cookies
Let icing set completely before storing
Store in airtight container up to 3 days
- Prep Time: 45 minutes
- Cook Time: 7 minutes
- Category: Cookies
- Method: Baking
- Cuisine: American
- Diet: Vegetarian
Nutrition
- Serving Size: 1 cookie
- Calories: 180
- Sugar: 18g
- Sodium: 60mg
- Fat: 5g
- Saturated Fat: 3g
- Unsaturated Fat: 1g
- Trans Fat: 0g
- Carbohydrates: 26g
- Fiber: 1g
- Protein: 2g
- Cholesterol: 25mg